Friday, June 14, 2019

Flip Pocket Mini Album Tutorial by Anne Redfern

Hello, Anne here, it is my turn to share a tutorial this month here at Mini Album Makers. I have been a long time fan and follower of Anne from Anne's Papercreations, she makes the most stunning albums.  I have had this one bookmarked for a couple of years now and thought it was about time that I tried to create one.  Anne shares all the details on her blog HERE and you will also find details of a video tutorial too.


The finished size of this flip and pocket mini album is 6 inches x 4 inches (approx 15 cm x 10 cm).

To make the cover I took two 6 inch by 4 inch pieces of heavy card and the spine is 6 inches by 1.3/4 inches.  I attached these with strong binding tape, leaving a gap between the spine and the back and front so that the album would fold easily.
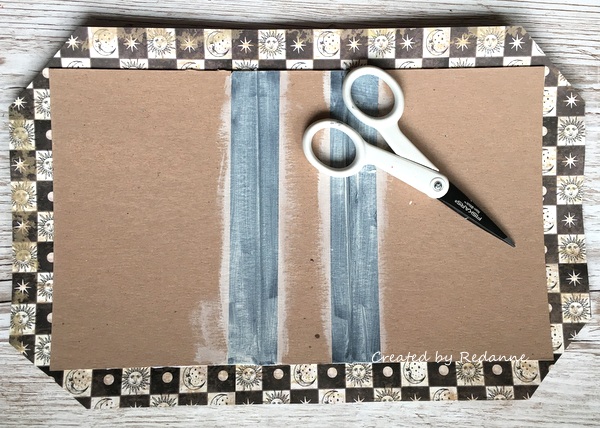

I attached the design paper to the front, using Matte Medium, mitered the corners and glued all the edges in place.


Above is the finished front.  I used papers by Stamperia throughout the album.


I finished off the inside of the cover with another piece of design paper.


Next I created the flip and pocket element.  Anne shows this very clearly in her video.  Each piece makes one complete flip and pocket and her design also incorporates the hinge.  I found this so much easier than making a separate hinge.  I am showing these elements in white paper so that it is clearer to see.

NOTE:  Anne's measurements are slightly larger than mine, I did not need to make thicker pocket elements for my album and so my measurements worked well for me.  If you would prefer to have thicker pockets then please follow Anne's measurements.


With the page open, cut across from the 6 inch mark to the middle only and also cut the hinge across from the edge to the first score line at the 6 inch mark.


Fold well on all score lines.  Fold from the right edge as shown in the middle picture above.  Now fold in the middle, away from the flaps and you will end up with one full flip pocket as shown above.


Once the three flip pockets are created, join them together as shown above.  This creates the hinge which will be glued into place inside the cover, using strong double sided tape.  I like to decorate the elements before attaching to the cover but it is your choice at this point.

When the three pockets are glued into place you will have three open pockets at the top and three open pockets at the side of the finished album.
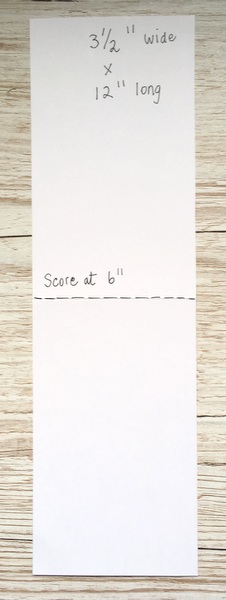

Create the photo mats (you will need three) as shown above.


Cover each of the mats with your chosen paper.  I covered both sides and created one plain mat on each, for journalling on.


Fold the mats ready to place in your album.


To decorate the album I used Stamperia papers and covered all of the flip elements, front and back but excluding the centre openings at the top and side as these will not be visible once the album is closed.


A view from the inside before the mats are tucked inside.
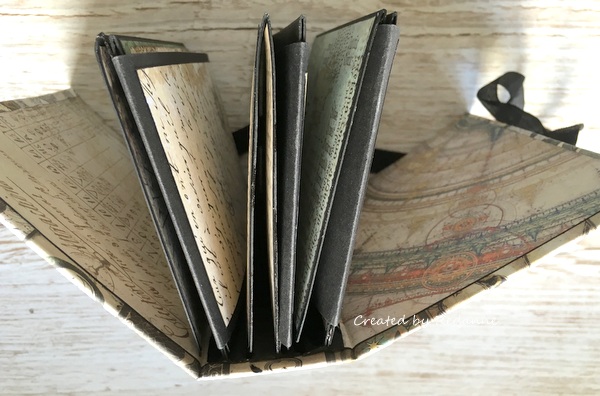

 A view from the top showing the mats tucked into the top pockets. 


A view from the inside showing the mats slipped into the pockets.


I added some black seam binding as a closure, held in place with a piece of design paper, front and back.  The above picture is the back of the album.


Finally, I made some small tags to fit in each of the side pockets. I hope you will check out Anne's (Papercreations) video tutorial HERE.  Thanks so much for your visit, I hope you have a lovely weekend. Hugs, Anne  xxx
You are invited to the Inlinkz link party!
Click here to enter

Saturday, June 1, 2019

June Mini Album Tutorials and Challenge

Welcome to Mini Album Makers Challenge for our June challenge.  We were thrilled to see your beautiful entries in our May challenge and cannot wait to see what you come up with this month.  Our DT is busy at work to bring you a fresh batch of inspiration for all of your book making pleasures.  We would like to take a moment to say farewell to DT members Gina and Maria.  We have loved your work and friendship and wish you all the best in your future endeavors.  And now let's see what our designers have to inspire us this month...

Anne

I decided to create something a little different this month - a piece of book art with an underwater sea theme.  You can see what's inside the box HERE on my blog.


This month I'm sharing the beginnings of my Junk Journal. To see how it came to be and a peep of what's within please pop on over HERE.


Nancy

Apparently I've been slacking because I missed a super easy way to create a mini-book cover.  Check out my blog to see what's been going on in Nancy-land.


Heather

Catherine Moore is our sponsor this month! Her Character Constructions stamps, dies, and papers are fabulous and I've used some in my book for this month. Come See!


Inna


Hello mini album friends!  I am very inspired by the summer that came to us in Siberia. And I made a mini album that shows how beautiful the summer is.  I recorded a video tutorial for you. Welcome to my BLOG to see how I made parts of the album.

*****************************************************************

Our generous prize sponsor this month is Character Constructions with a $25 gift certificate.  


Our challenge follows a few simple rules:
Any Handmade Book Goes.  Enter any form of handmade mini albums, scrapbooks, journals and book arts.  Our focus is on completed works, so no layouts or journal spreads that are not part of a complete handmade book project.  You do not have to provide a tutorial, but we wish you would.  Feel free to use one of the DT tutorials to make your project and give proper credit where due.  No back linking allowed.  You must add our badge to your post and link to our challenge to be eligible to win the prize.  Combine with any other challenges as applicable.  Please limit to entering 3 (three) handmade books per month in our challenge.  Permalinks only and no back linking.  Share the love by visiting and commenting on other entries.  Please become a follower.  That's it - have fun!


* Make sure to add our badge to your post *
and link back to our challenge. 


*GET SOCIAL*
Submit your entries to our Facebook page for extra love.
Tag us @minialbummakers with your entries on Instagram for a repost.

Please note: This is a public blog and by linking your project you agree to have your name, blog link and the creation you linked shown on this blog and other Mini Album Maker Challenge social media sites. If you do not agree to this, please do not join in the challenge. Also, remember that any comments and/or linked projects left on this blog will be visible/clickable by third parties as this blog is public.  Email addresses are required for entry by InLinkz and accessible to this blog's moderators.  Your email address may be used to contact you regarding your entries.  We will not share your information willingly for any other purposes.  (This was posted to be in compliance with the new GDPR law that will soon become effective in the EU, and will also apply to blogs located in the US if blog visitors reside in the EU.
You are invited to the Inlinkz link party!
Click here to enter


You are invited to the Inlinkz link party!
Click here to enter