Friday, February 22, 2019

Winners Post for January 2019

Where is this year going?  We had a small number of entries in our January challenge, but they were incredible works!  Check out all of the amazing projects from the challenge HERE.  It's never an easy job to narrow down to a few winners, but without further ado...


The overall design team favorite badge goes to Evelyn Walter of Evelyn's Colorful World.  Evelyn amazed us with this clever design for a replaceable calendar holder.


She shares all the details for construction along with her fabulous mixed media tricks on her YouTube video tutorial.  So make sure to take a peek...


Evelyn, we would love for you to be our guest designer for the month of March.  Please email Autumn at teamclark@rocketmail.com to discuss further.


Our top five entries are equally incredible.  Each of you, please take our top five badge and display it proudly on your blogs.  In no particular order...


And the winner is..... Olga Ragozina from Gifts from the Heart!  Hooray Olga!  Please email Autumn at teamclark@rocketmail.com to claim your prize.

We hope all of this inspiration has prompted you to join our Fabruary challenge for a chance to win a prize pack from Rubber Moon: Art stamps that are out of this world!


Wednesday, February 20, 2019

Winners Post for November/December 2018

Wow!  What an amazing array of albums entered in our November/December challenge.  We appologize for the late results and thank you for your patience.  Check out all of the amazing projects from the challenge HERE.  It's never an easy job to narrow down to a few winners, but without further ado...


The overall design team favorite badge goes to Elena Mashkina of Myscrape.  We are smitten with Elena's use of texture, color and imagery.


Elena, we would love for you to be our guest designer for the month of March.  Please email Autumn at teamclark@rocketmail.com to discuss further.


Our top five entries are equally incredible.  Each of you, please take our top five badge and display it proudly on your blogs.  In no particular order...


Huge thanks to each of you who played along.  And now, the winning entry of the Gypsy Soul Laser Cuts Prize Pack...


And the winner is..... Angela from Felix the Crafty Cat!  Angela shared the  most splendid Christmas album with us.  Make sure to check it out.  Angela, please email Autumn at teamclark@rocketmail.com to claim your prize. 


We'll be back soon with the winners from our January challenge.  Meanwhile, won't you join our Fabruary challenge for a chance to win a prize pack from Rubber Moon: Art stamps that are out of this world!


Thursday, February 14, 2019

Birthday Brag Book Tutorial by Gina Hubbard


Hello everyone.  It's Gina here today with a tutorial on this cute tri-fold brag book.  This one is themed for a little girl's birthday but this is a book that would be great for any theme.  I kept the front of mine pretty simple as it is meant to be tossed in a purse or bag and kept right at hand to show off the photos it will hold.


To create this book you will need:
(3) 12x12 inch sheets of base cardstock (I used black)
(2) 12x12 inch sheets of coordinating cardstock (I used Bazzill Julep)
(4-5) 12x12 inch sheets patterned paper (I used Pebbles Birthday Wishes)
Coordinating Cut aparts or embellishments
1 yard of ribbon or other trim that can easily be tied.
Wet glue
Double sided tape

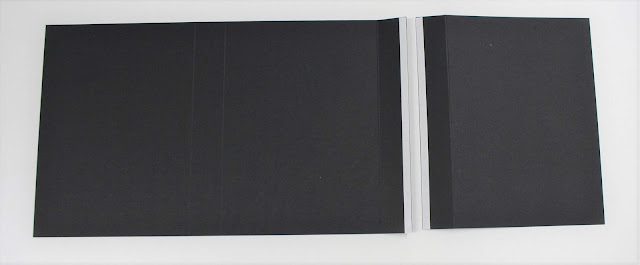
Begin by cutting a piece of your base color cardstock to 12 inches by 7 inches.  Score at 5 inches, 6 inches and 11 inches on the 12 inch side.  Put aside.
Cut a piece of your base color cardstock to 6 inches by 7 inches.  Score at 1 inch on the 6 inch side.


Using double sided tape on the edges as shown, and wet glue in the center, overlap and attach the two pieces of your base to form a single piece 17 inches by 7 inches.  Fold and burnish all score lines.


Turn over your base piece so you are working on the outside of the base.


Using double sided tape and wet glue, attach your ribbon to the front, spine, back and second spine as shown below.  Be careful that you do not attach the ribbon to the inside flap.


Cut 6 pieces of your coordinating color card 4 3/4 inches by 6 3/4 inches, and 4 pieces 3/4 inch by 6 3/4 inches.Put three of the large pieces and two of the smaller pieces aside to use later on the inside of your folder.  Attach the cardstock panels as shown, remembering to place the inside panel piece directly against the base with the ribbon over it.


To create the insert photo booklet you will need two pieces of your base color cardstock, each of them 6 inches by 12 inches.  Score each piece at 4 1/2 inches and 9 inches along the 12 inch side.


Overlap the two 3 inch sections by 1 1/2 inch and attach.


Accordion fold to create your booklet.


For the pocket you will need a piece of your base color cardstock that measures 4 3/4 inches by 7 1/4 inches.  Score and cut as shown in the diagram below.  Attach pocket to middle inside panel over the coordinating cardstock.


Cut your patterned paper to fit your panels and decorate to fit your theme.


Use coordinating cut aparts and stickers to decorate your pages.


Thanks for visiting and checking out the tutorial for this little book.  I hope you enjoy making it as much as I have.

Friday, February 1, 2019

February Mini Album Tutorials and Challenge

Happy February book makers!  We hope your year is off to a great start.  Thank you for your patience with the delay in announcing our November/December challenge winners.  We promise those will be forthcoming.  If you didn't get a chance to join our January challenge, please make sure to take a look back and see those fabulous entries.  We are thrilled to announce our latest DT member, Heather Maxwell of Vestige Blog.  Let's see what she and our other designers have created for our challenge inspiration...

Heather


Sometimes it's fun to work small. This sweet little journal is made starting with a kit from Gypsy Soul Laser Cuts. I then had a lovely time adding and embellishing. Come visit my blog to see how I did it.


Inna


Hello friends! I made a mixed media cover for notebook and recorded a video tutorial for you.  Hope this video will be useful for you.  Subscribe to my channel.


Anne


Each year I like to make a mini journal / diary to keep notes, thoughts and appointments in.  If you would like to see more of my project, please visit HERE for more detail.


Nancy

Mini books don't have to be complicated to assemble.  This is so easy to create.
With just a few rings, an easel-type construction and the size pages you want
you can create your own easel flip book.  Please visit my site to see each page.


Jennie


If you are like me and love making ATCs it is great to have a mini album to showcase some of your favourites. I have made this mini book using envelopes which was fun and quick to make and of course easy to decorate as the ATCs were all ready to stick in.   Do join me over on my blog if you would like to see more.


Gina

This adorable album is created using the newest album kit from Gypsy Soul Laser Cuts and features flip panels with a shaped edge.  Check out my post to see the kit and how I decorated mine.


Our generous sponsor this month is
Logo
and the super talented Kae Pea aka Kristen Powers.

You probably are aware of her amazing rubber stamps,  as well as her stencils
and now her unique inks called
Moonlight Duo Tint & Hue Ink
Take a look at her artistry here & follow along for ideas galore:
RubberMoon Dream it. Make it.™
The Moon & The Maker Creative Space.™
RubberMoon Newsletter * Instagram Facebook * Twitter


Our challenge follows a few simple rules:
Any Handmade Book Goes.  Enter any form of handmade mini albums, scrapbooks, journals and book arts.  Our focus is on completed works, so no layouts or journal spreads that are not part of a complete handmade book project.  You do not have to provide a tutorial, but we wish you would.  Feel free to use one of the DT tutorials to make your project and give proper credit where due.  No back linking allowed.  You must add our badge to your post and link to our challenge to be eligible to win the prize.  Combine with any other challenges as applicable.  Please limit to entering 3 (three) handmade books per month in our challenge.  Permalinks only and no back linking.  Share the love by visiting and commenting on other entries.  Please become a follower.  That's it - have fun!

* Make sure to add our badge to your post *
and link back to our challenge. 


*GET SOCIAL*
Submit your entries to our Facebook page for extra love.
Tag us @minialbummakers with your entries on Instagram for a repost.

Please note: This is a public blog and by linking your project you agree to have your name, blog link and the creation you linked shown on this blog and other Mini Album Maker Challenge social media sites. If you do not agree to this, please do not join in the challenge. Also, remember that any comments and/or linked projects left on this blog will be visible/clickable by third parties as this blog is public.  Email addresses are required for entry by InLinkz and accessible to this blog's moderators.  Your email address may be used to contact you regarding your entries.  We will not share your information willingly for any other purposes.  (This was posted to be in compliance with the new GDPR law that will soon become effective in the EU, and will also apply to blogs located in the US if blog visitors reside in the EU.)

Inlinkz Link Party